
What to contemplate it
Door sizes tend to be standardised on three most frequent widths, that are nevertheless exact in imperial terms: 2ft 3in (686mm), 2ft 6in (762mm) and 2ft 9in (838mm). When you have a non-standard entrance, you may have to have a new door specifically made. Many off-the-shelf doors will likely be a very tight easily fit into a standard door framework, and for that reason just require a little bit trimmed off their height and edges being fit them exactly.
Discover often a limit to simply how much you can easily trim a home (around 10mm in total), therefore always check instructions before starting. You need to pull equal amounts from both sides of a door.
Switching inner doorways will instantly revitalise a space, however, the job is dramatically easier by using the exact same sized hinges as prior to, and certainly will consequently utilize the exact same hinge positions which can be already from the door frame. This is basically the technique shown in this leaflet. If frame (door liner) is also brand new, simply measure off hinge opportunities in the lining additionally, and cut out with the exact same axioms as shown when it comes to door advantage.
Unless you use the old hinge positions as recommendations for hanging a fresh door, the conventional placement for relies upon a door advantage tend to be 15cm down through the top and 22.5cm up from bottom. For a heavy door, a third hinge can be put equidistant between both of these.
There are lots of techniques to finish your brand-new home, from paint, towards huge number of easy-toapply normal timber finishes which are available nowadays.
Handles and latches are normally perhaps not incorporated with an off-the-shelf door. This permits you to select your chosen design.
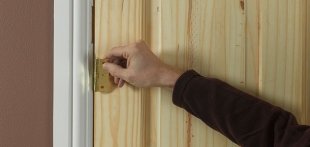
Favourite handles can be used again on a brand new home, but make sure that the latch works effortlessly. If it doesn't, they have been cheap to change. To eliminate an old door, you may have to make use of a screwdriver to loosen old paint around the hinges plus in the slot machines of the screws. Utilize a hammer to touch the handle for the screwdriver utilizing the slot end added to the screwheads. Several taps will most likely break the paint seal and make unscrewing the screws feasible.
The latch dish and doorstop (thin batten of timber within the door frame that stops the doorway) might need minor changes whenever a new home is fitted. A great deal is determined by the latest home becoming the exact same depth because the old, and whether you place the handle in the same position when it comes to old door.
 be careful when making use of chisels, constantly follow three principles:
- Keep hands behind the cutting edge
- Chisel from your body
- Constantly secure the timber you're taking care of with a clamp or vice
Fit an interior door
1Take away the old door. Ideally, want to maintain the doorstop in the same destination. This may generally speaking act as long given that new door is similar level because the old. For thicker doorways, the doorstop position will have to be modified.
2Permit a 3mm gap amongst the hinged side of the doorway in addition to liner. A butt hinge is right to measure this space.
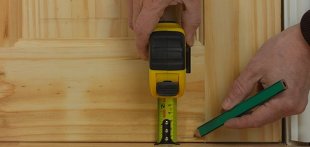
3In the closing edge, measure for a 3mm space. Draw a line on both sides for the home which means you decrease both edges similarly.
4Put the door on its edges and plane back once again to the pen outlines. Replace home and look 3mm gaps on both sides.
5You also need a 3mm gap at the very top and bottom of this door. Remember the finished degree of a floor.
6Mark with pen lines as before and jet off as required. With all the plane, work from exterior side of the doorway inwards to stop splitting the finish whole grain. To remove more than a few millimetres, use a hand saw.
7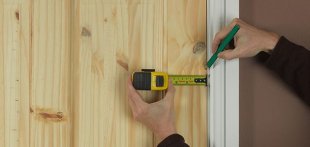 Reposition the newly planed home. Mark across from precise place of this old depends on the liner on the new door advantage.
Lay the doorway on its side and use the marks to position the hinges. Draw a line around all of them and mark hinge thickness on the front side also.
9Use a chisel to help make two slices at either end associated with the hinge position, enabling the chisel part to reduce somewhat beyond the range edge.
10Very carefully run a retractable knife over the lengthy side of the pen range involving the two chiselled cuts, pressing solidly but uniformly. Reduce to hinge level.
11Eliminate the noticeable lumber with a chisel. Make slices across the grain every 5-10mm, so you usually do not split the lumber, tapping within the chisel to hinge level.
12Carefully utilize the chisel blade to get rid of the timber by tapping the chisel over the pen range at the front end edge of the door, in the level for the hinge.
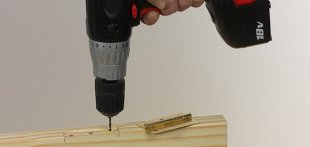
13When you've got removed lumber from all hinge jobs, hold each hinge set up, level screw holes and pilot drill (2-3mm little bit perfect). Safe all hinges.
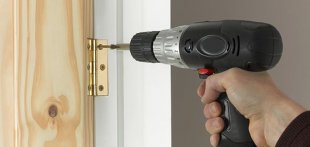
14Fit one other 50 % of the hinge into current hinge positions regarding the home lining and screw in place. You will need anyone to keep the door.
15Mark top, bottom and end of latch situation onto home face – line up with current attack plate on home framework.
16Continue pen outlines across home side and draw a straight guide through the middle of this horizontal lines.
17Measure the latch length as well as the length from latch end towards the spindle center and mark on home.
18Pick a flat little bit that's somewhat larger than the latch casing and level the latch level with tape.
19Put the bit point on the vertical guide regarding door edge and drill gradually on necessary level. Be exact.
20At the marked off spindle place drill carefully into each home face using care to not ever separate the lumber.
21Push the latch in to the hole and position specifically straight. Draw a pencil range round the latch plate.
22Remove the latch and chisel away the lumber inside the instructions toward depth of the latch plate.
23Push the latch into position, ensuring the latch plate sits snugly. Drill pilot holes when it comes to screws and secure.
24Insert the spindle through the latch. Long spindles might need lowering with a junior hacksaw.
25Position the handles regarding the spindle. Cause them to become correctly vertical and make use of an awl to mark repairing holes.
26Repair handles in position with a hand-held screwdriver, as a drill/driver can fall and scrape the handle areas.
27Close the door and check that latch engages properly using strike dish on the door frame.
28If the strike dish requires any minor adjustment, unscrew it, chisel out any timber as needed and refix the plate.
29In the event that home rattles, or doesn't near securely up against the doorstop, lever it off with a chisel and reposition it.
30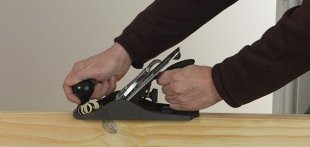
RELATED VIDEO


Share this Post
latest post
-
 Doors Handles and Locks October 12, 2022
 -
 Hardware for French doors interior September 28, 2022
 -
 Interior Door Hardware September 28, 2022
 -
 Wicker out Door Furniture September 28, 2022
 -
 Lever Handles Door Hardware September 27, 2022
 -
 Soft close Door Hardware September 14, 2022
 -
 Commercial Doors, Hardware, Parts September 14, 2022
 -
 Drawer Door Knobs September 14, 2022
 -
 Front door furniture UK September 14, 2022